Hướng dẫn Mu Online Season 9
Season 9 (2014) chia làm hai nửa. Part 1 mở chiến trường liên server Battle Core cùng giải vô địch Plaza of Trials, thêm Uruk Mountain vào Acheron và seed sphere Tetra bậc 4, đồng thời cho muun làm thú cưỡi và hỗ trợ màn hình rộng. Part 2 làm lại chỉ số nhân vật xoay quanh specialization, mở rộng cây master skill của Fist Master, giới thiệu hộp thưởng Gremory Case cùng Wings of Conqueror và Ring of Dark Transformation vĩnh viễn.
Battle Core: chiến trường liên server
Battle Core là một server riêng mà mọi server thường có thể đăng nhập vào cùng lúc. Bạn đăng ký tham gia qua NPC Elin ở chợ Lorencia (113, 132) hoặc từ cửa sổ thông báo, sau đó mở thêm một client game thứ hai và chọn server Battle Core bằng cùng tài khoản. Nhân vật của bạn được sao chép — tên tài khoản, tên nhân vật, chỉ số, skill, item cash và túi đồ đang mặc/thường đều đi theo; rương đồ, nhiệm vụ, danh sách cộng đồng, thiết lập MU Helper và zen thì không.
| Quy định Battle Core | Chi tiết |
|---|---|
| Yêu cầu level | Không — level nào cũng đăng ký được |
| Số nhân vật mỗi tài khoản | 2 |
| Thời gian đến khi vào được | Khoảng 3 phút sau khi đăng ký |
| Zen khởi đầu trên Battle Core | 100,000,000 |
| Giá NPC | Mọi lần mua, bán và sửa đồ đều tốn 1 zen |
| Bị khóa khi đã đăng ký | Giao dịch, personal store và rương đồ (trên cả hai server) |
| Cộng đồng | Không chat hay mail 1:1; thì thầm chỉ trong cùng server; không đổi guild hay Gens |
| Dịch vụ premium | Chuyển nhân vật/server hoặc đổi tên sẽ reset điểm Battle Core của bạn |
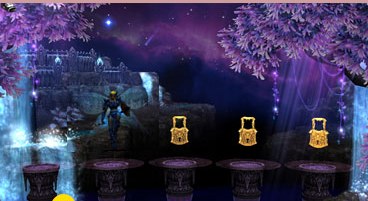
Hủy đăng ký tham gia (“Battle Core entry release”) sẽ đóng client Battle Core và mở lại giao dịch; thành tích giải đấu vẫn được giữ, nên đăng ký lại thì tiếp tục từ chỗ cũ.
Chaos Castle (Battle)
Chaos Castle (Battle) là sự kiện hằng ngày của Battle Core. Mua vé vào — chính là Guardsman's Armor Set — từ bất kỳ NPC shop nào ở chợ Lorencia của Battle Core và chuột phải vào nó trong túi đồ từ năm phút trước giờ bắt đầu. Luật giống Chaos Castle tiêu chuẩn: tối đa 70 người chơi, số quái xuất hiện = 100 trừ số người chơi, và người sống sót cuối cùng thắng. Giờ vào là 20:30 và 22:00.
| Castle | Khoảng level | Quái rơi ra | Người thắng |
|---|---|---|---|
| Chaos Castle 1 | 50 – 179 | Guardsman's Box ×4 | Guard Captain's Box |
| Chaos Castle 2 | 180 – 269 | Guardsman's Box ×4 | Guard Captain's Box |
| Chaos Castle 3 | 270 – 349 | Guardsman's Box ×4 | Guard Captain's Box |
| Chaos Castle 4 | 350 – 399 | Guardsman's Box ×4 | Guard Captain's Box |
| Chaos Castle 5 | 400 – 500 | Guardsman's Box ×5 | Guard Captain's Box |
| Chaos Castle 6 | 501 – 650 | Guardsman's Box ×5 | Guard Captain's Box |
| Chaos Castle 7 | 651 + | Guardsman's Box ×6 | Guard Captain's Box |
Guardsman's Box chứa Blessing of Light (thấp, trung hoặc cao); Guard Captain's Box chứa loại trung và cao cùng bó ngọc. Nếu lượt đó không ai thắng thì không có thưởng cho người thắng.
| Blessing of Light | Hiệu quả |
|---|---|
| Cấp thấp | +50% kinh nghiệm trong 30 phút |
| Trung | +100% kinh nghiệm trong 30 phút |
| Cấp cao | +200% kinh nghiệm trong 30 phút |
Battle Core cũng tổ chức Chaos Castle thường vào 20 khung giờ cố định mỗi ngày, tính 2 điểm mỗi quái, 3 mỗi người chơi bị hạ và 50 cho chiến thắng.
Giải vô địch Plaza of Trials
Plaza of Trials là phiên bản Devil Square khó, theo đội hai người, được tổ chức thành giải vô địch hằng tháng trên Battle Core. Một trận gồm 15 vòng mỗi vòng hai phút, nghỉ 10–20 giây giữa các vòng; vòng 5, 10 và 15 là vòng boss, có hơn 200 quái mạnh hơn xuất hiện cùng lúc. Mỗi phòng có từ hai đến mười đội.
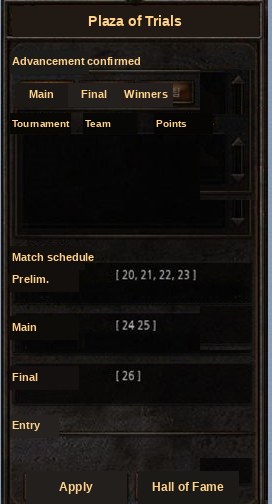
| Giai đoạn | Ngày | Giờ | Thể thức |
|---|---|---|---|
| Vòng loại | Ngày 20 – 23 | 18:00, 19:00, 20:00, 21:00, 22:00 | 5 trận mỗi ngày, top 2 đi tiếp — tối đa 40 đội |
| Vòng chính | Ngày 24 – 25 | 18:00, 19:00, 20:00, 21:00, 22:00 | 5 trận mỗi ngày, đội thắng đi tiếp — tối đa 10 đội |
| Chung kết | Cấp 26 | 22:00 | 1 trận; đội thắng là nhà vô địch |
Cả hai người chơi phải ở chợ Lorencia trong party hai người; trưởng party đăng ký tại NPC Might và thành viên chấp nhận. Cổng vào mở năm phút trước giờ bắt đầu, và rời bản đồ sự kiện thì không vào lại được. Đội hình tự do trong vòng loại nhưng bị khóa khi bạn đã vào vòng chính.
Tính điểm
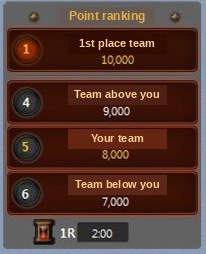
Điểm vòng = (số quái giết × điểm săn) + (điểm thưởng × số thành viên đội còn sống). Mỗi vòng có quái riêng và điểm riêng, cùng một quái vàng đáng giá hơn nhiều.
| Vòng | Quái | Điểm | Quái vàng | Điểm quái vàng |
|---|---|---|---|---|
| 1 | Gollock | 300 | Golden Tantalos (vòng 1–5) | 10,000 |
| 2 | Balram | 600 | ↑ | ↑ |
| 3 | Bloody Orc | 900 | ↑ | ↑ |
| 4 | Condra | 1,200 | ↑ | ↑ |
| 5 (boss) | Werewolf (Hero) | 3,000 | ↑ | ↑ |
| 6 | Bloody Death Rider | 1,500 | Golden Erohim (vòng 6–10) | 30,000 |
| 7 | Bloody Witch Queen | 1,800 | ↑ | ↑ |
| 8 | Scout (Hero) | 2,100 | ↑ | ↑ |
| 9 | Necron | 2,400 | ↑ | ↑ |
| 10 (boss) | Sapi Queen | 10,000 | ↑ | ↑ |
| 11 | Kentauros Warrior | 2,700 | Golden Hell Maine (vòng 11–15) | 90,000 |
| 12 | Death Centurion | 3,000 | ↑ | ↑ |
| 13 | Shriker | 3,300 | ↑ | ↑ |
| 14 | Genocider Warrior | 5,000 | ↑ | ↑ |
| 15 (boss) | Dark Elf | 200,000 | ↑ | ↑ |
Phần thưởng vô địch: Wings of Conqueror và Ring of Dark Transformation
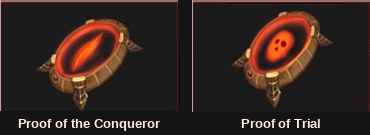
Cả hai vật chứng nhận đều được đổi thành phần thưởng thật tại Chaos Goblin ở Noria (180, 103) bằng ghép thường (chaos) với tỷ lệ thành công 100%. Công thức giống nhau cho cả hai: vật chứng nhận cộng một bó 10 Jewel of Bless, một bó 10 Jewel of Soul, một bó 10 Jewel of Life và một Jewel of Chaos.
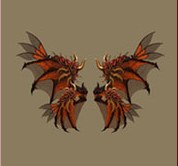
Khác với phiên bản giới hạn thời gian trước đây, Wings of Conqueror lần này là vĩnh viễn. Cánh ra lò ở +0 với một hoặc hai option cánh ngẫu nhiên, mang dòng riêng Lực tấn công 100 tăng thêm 5 mỗi level item, và nhận thêm option từ Jewel of Life. Việc nâng cấp theo quy tắc cánh cấp 3 thông thường: +0 đến +9 bằng ngọc như thường lệ, +10 đến +15 qua ghép chaos.
| Level item | +0 | +3 | +6 | +9 | +12 | +15 |
|---|---|---|---|---|---|---|
| Lực tấn công | 100 | 115 | 130 | 145 | 160 | 175 |
| Phòng thủ | 60 | 76 | 88 | 100 | 118 | 145 |
| Tăng sát thương | 39% | 45% | 51% | 57% | 63% | 69% |
| Hấp thụ sát thương | 39% | 45% | 51% | 57% | 63% | 69% |
Option ngẫu nhiên khi tạo (một hoặc hai trong ba): tỷ lệ hồi đầy HP +5%, tỷ lệ phản sát thương của kẻ tấn công +5%, tỷ lệ gây sát thương bỏ qua phòng thủ +5%. Jewel of Life thêm tự hồi HP 1–4%, lực tấn công cộng thêm +4/+8/+12/+16 hoặc sức mạnh phép / nguyền cộng thêm +4/+8/+12/+16.
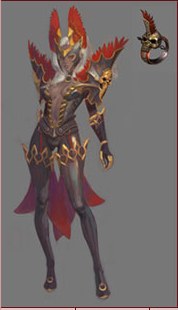
Ring of Dark Transformation thay thế các nhẫn biến hình giới hạn thời gian cũ. Độ bền giảm khi sử dụng và được sửa bằng cách kéo Jewel of Bless thả vào nó — 50 độ bền mỗi viên ngọc, tỷ lệ thành công 100%. Giống các nhẫn khác, nó tạo thành set với một pet.
| Pet / nhẫn | Hiệu ứng pet | Hiệu ứng nhẫn | Hiệu ứng set |
|---|---|---|---|
| Skeleton | Tấn công/phép/nguyền +20%, tốc độ đánh +10,, EXP 30% | Tấn công/phép/nguyền +40 | EXP +50% |
| Panda | EXP 50%, phòng thủ +50 | Zen +50%, tấn công/phép/nguyền +30 | EXP +50% |
| Robot Knight | — | Zen +50%, tấn công/phép/nguyền +30 | EXP +50% |
| Demon | Tấn công/phép/nguyền +40%, tốc độ đánh +10 | — | — |
| Guardian Spirit | Hấp thụ 30% sát thương, HP tối đa +50 | — | — |
| Ring of Dark Transformation | — | Tấn công/phép/nguyền +70,, tốc độ đánh +10,, phòng thủ +50,, HP tối đa +50 | EXP +50% |
Phần thưởng trận đấu thông thường cũng có rơi ra: Gift of the Knights Order ở Chaos Castle và Devil's Box ở Plaza of Trials (từ quái vòng 5, 10 và 15). Hộp vòng loại chứa ngọc; hộp vòng chính và chung kết có thêm set item hoặc vũ khí socket level 400 như Asura, và hộp cao cấp ở chung kết có cơ hội ra chúng cao nhất.
Uruk Mountain, khu vực thứ tư của Acheron
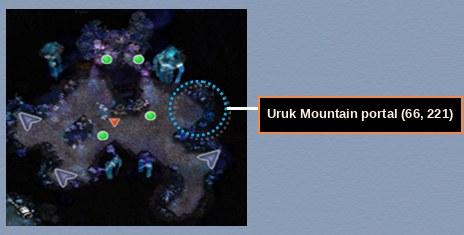
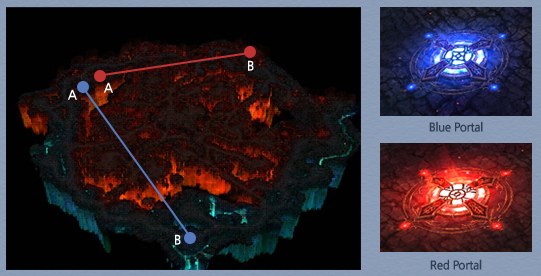
Uruk Mountain là khu vực thứ tư và khó nhất của Acheron. Arca War và sự kiện Acheron Guardian không diễn ra ở đây, và nếu chết hoặc thoát game bạn sẽ bị đưa về vùng an toàn Acheron.
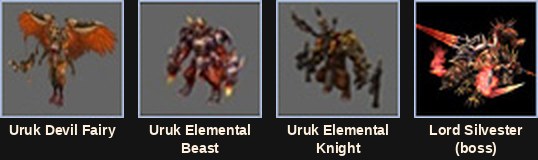
| Quái | Level | HP | Tấn công | Phòng thủ | Tỷ lệ phòng thủ | Tấn công nguyên tố | Phòng thủ nguyên tố |
|---|---|---|---|---|---|---|---|
| Uruk Devil Fairy | 115 | 68,000 | 730–760 | 630 | 300 | 700–730 | 420 |
| Uruk Elemental Beast | 117 | 75,000 | 770–800 | 150 | 320 | 740–770 | 440 |
| Uruk Elemental Knight | 117 | 80,000 | 810–840 | 680 | 310 | 780–810 | 460 |
| Lord Silvester (boss) | 180 | 8,000,000 | 5,000–6,000 | 1,400 | 4,000 | 1,700–2,300 | 700 |
Lord Silvester
Boss hồi sinh mỗi 24 giờ và mỗi lần được gán một nguyên tố ngẫu nhiên. Đòn đánh thường của hắn có thể gây choáng; Wind Whirlwind gây sát thương và đẩy lùi mọi người xung quanh; Curse of the Wind lấy đi 20% HP của bạn và hất bạn văng ra; Call of the Wind kích hoạt ở mức 70%, 50% và 20% HP, triệu hồi ba quái — cho đến khi chúng chết hết, boss không thể nhận sát thương. Bỏ mặc hắn thì hắn sẽ hồi 20,000 HP mỗi giây. Hạ hắn sẽ rơi ra pentagram, item socket, sphere và tetra crystal.
Seed sphere bậc 4 (Tetra)
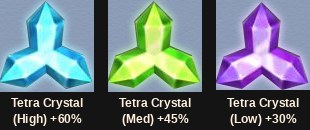
Bậc sphere thứ tư, Tetra, rơi ra từ quái ở level 132 trở lên. Việc ghép seed với sphere vẫn thực hiện tại Seed Master và vẫn mất sạch mọi thứ nếu thất bại, nên Tetra Crystal mới rất quan trọng.
| Nguyên liệu | SL | Ghi chú |
|---|---|---|
| Sphere (Tetra) cấp 4 | 1 | Bắt buộc |
| Seed Sphere (Tri) cấp 3 | 1 | Bắt buộc — nguyên tố của nó quyết định nguyên tố của kết quả |
| Bundle of Jewel of Chaos (10) | 1 | Bắt buộc |
| Bundle of Jewel of Creation (10) | 1 | Bắt buộc |
| Zen | 1,000,000 | Bắt buộc |
| Tetra Crystal | 1 | Tùy chọn — chỉ được đặt một viên |
Option socket thưởng thêm
Khảm đủ một bộ sphere tương ứng vẫn tạo ra option thưởng, nhưng bộ toàn Tetra có thể ra phiên bản độc quyền mạnh hơn nhiều.
| Trang bị | Nguyên tố | Option (bậc 1–4, 30%) | Option (toàn Tetra, 10%) |
|---|---|---|---|
| Vũ khí, cung, quyền trượng | Lửa / Sét / Băng | Lực tấn công +11 | Lực tấn công +22 |
| Vũ khí, cung, quyền trượng | Sét / Băng / Lửa | Lực tấn công skill +11 | Lực tấn công skill +22 |
| Staff | Lửa / Sét / Băng | Lực tấn công & sức mạnh phép +5 | Lực tấn công & sức mạnh phép +10 |
| Staff | Sét / Băng / Lửa | Lực tấn công skill +11 | Lực tấn công skill +22 |
| Giáp và khiên | Nước / Đất / Gió | Phòng thủ +24 | Phòng thủ +27 |
| Giáp và khiên | Đất / Gió / Nước | HP tối đa +29 | HP tối đa +31 |
Khảm hoặc trích xuất sphere trên item đã có option thưởng có thể làm mất option đó, nên hãy hoàn thiện bộ trước rồi hãy thử nghiệm.
Phá hủy nay trở thành trích xuất: Seed Researcher lấy seed sphere đã khảm ra lại dưới dạng seed cùng nguyên tố (bản thân sphere bị mất). Chi phí là 1 Jewel of Guardian, 5 Jewel of Chaos và 5 Jewel of Harmony; nếu thất bại chỉ mất nguyên liệu và seed sphere vẫn nằm trong item. Tooltip giờ hiển thị bậc dưới dạng [Tier: 4].
Làm mới nhân vật: chuyên môn hóa chỉ số
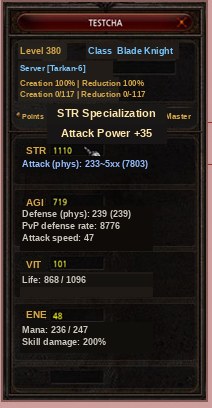
Part 2 gắn mỗi class với một chỉ số gốc, giờ dùng để tăng một năng lực thưởng. Chỉ số thưởng được tính từ toàn bộ chỉ số của bạn — điểm cộng thuần, trái cây, cây master, set item và buff chỉ số — và được cộng theo công thức lực tấn công + chuyên môn hóa + tấn công vũ khí = tấn công tối đa.
| Class | Năng lực | Chỉ số gốc | Bậc 1 | Bậc 2 | Bậc 3 |
|---|---|---|---|---|---|
| Dark Knight | Lực tấn công / Phòng thủ | STR / AGI | 1–1500: 0–10% | 1501–2000: 10–30% | 2001–3000: 30–45% |
| Dark Wizard | Phép, tỷ lệ tấn công & tỷ lệ tấn công thành công PvP | ENE / AGI | 1–1500: 0–10% | 1501–2000: 10–30% | 2001–3000: 30–45% |
| Elf | Lực tấn công, phòng thủ & tỷ lệ phòng thủ PvP | AGI | 1–1800: 0–10% | 1801–2100: 10–30% | 2101–3000: 30–45% |
| Summoner | Sức mạnh phép / nguyền | ENE | 1–1500: 0–10% | 1501–2000: 10–30% | 2001–3000: 30–45% |
| Magic Gladiator | Lực tấn công | STR | 1–1500: 0–10% | 1501–2000: 10–30% | 2001–3000: 30–45% |
| Magic Gladiator | Phép | ENE | 1–1800: 0–10% | 1801–2500: 10–30% | 2501–3000: 30–45% |
| Dark Lord | Lực tấn công / Phòng thủ | STR / AGI | 1–1500: 0–10% | 1501–2000: 10–30% | 2001–3000: 30–45% |
| Rage Fighter | Lực tấn công | STR | 1–1500: 0–10% | 1501–2000: 10–30% | 2001–3000: 30–45% |
Công thức sát thương kỹ năng
Sát thương kỹ năng được viết lại thành giá trị cố định cộng với chỉ số chia cho một hệ số, nên chỉ số cao vẫn phát huy ở mọi level. Một số công thức mới:
| Class | Skill | Công thức |
|---|---|---|
| Dark Knight | Twisting Slash | STR / 40 |
| Dark Knight | Rageful Blow | 70 + STR / 150 |
| Dark Knight | Blood Storm | 170 + STR / 200 |
| Dark Wizard | Evil Spirit | 45 + ENE / 150 |
| Dark Wizard | Hellfire | 120 + ENE / 200 |
| Dark Wizard | Earth Prison | 150 + ENE / 200 |
| Elf | Triple Shot | AGI / 100 |
| Elf | Ice Arrow | 105 + AGI / 150 |
| Elf | Poison Arrow | 130 + AGI / 100 |
| Summoner | Lightning Shock | 95 + ENE / 200 |
| Magic Gladiator | Gigantic Storm | 110 + ENE / 250 |
| Dark Lord | Electric Spark | 250 + STR / 100 |
| Dark Lord | Chaotic Diseier | 190 + STR / 150 |
| Rage Fighter | Killing Blow / Beast Uppercut / Phoenix Shot | VIT / 200 |
Lưu ý với Rage Fighter: chuyên môn hóa của nó dựa trên sức mạnh, nhưng mọi công thức skill lại tăng theo thể lực.
Cây master skill của Fist Master
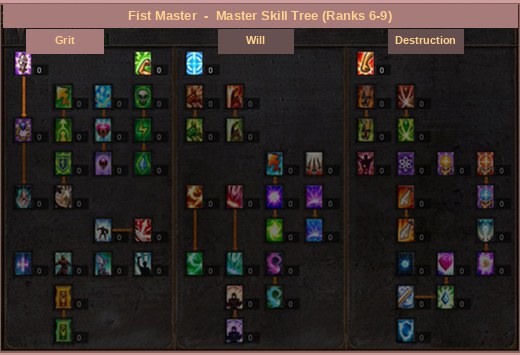
Cây skill class 3 của Rage Fighter có thêm 24 skill trải từ rank 6–9 trên ba nhánh.
| Bậc | Grit | Will | Destruction |
|---|---|---|---|
| 6 | Tăng phòng thủ set; Revenge (phản sát thương) | Tăng AG tối đa; Dragon Roar Mastery (sát thương lửa theo thời gian) | Lực tấn công tối đa; Tỷ lệ sát thương chí mạng |
| 7 | Tăng chỉ số Năng lượng, Thể lực, Nhanh nhẹn và Sức mạnh | Chain Drive Mastery (sát thương băng theo thời gian); Dark Side Mastery (tầm +1 ô với 10 điểm); cường hóa Dragon Slasher | Hồi đầy mana; hồi đầy HP (cả hai khi bị đánh); tỷ lệ sát thương hoàn hảo; tỷ lệ sát thương x2 |
| 8 | Cường hóa phòng thủ Cape of Overrule | Blood Howling; Dragon Slasher Mastery (tỷ lệ choáng 2 giây) | Hồi đầy SD (khi tấn công) |
| 9 | Cường hóa tấn công Cape of Overrule | Cường hóa Blood Howling | Tỷ lệ bỏ qua phòng thủ đối phương |
Blood Howling là skill nổi bật nhất: tự buff cho bản thân, sau đó mọi skill tấn công đều có tỷ lệ 10% gây hiệu ứng xấu lên mục tiêu, gây 200 sát thương mỗi 0.5 giây trong 10 giây. Nút rank 9 tăng cả sát thương chảy máu lẫn tỷ lệ kích hoạt.
Muun thú cưỡi và Stone of Magic Power
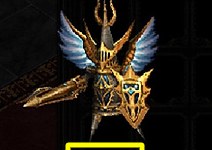
Muun được chia làm hai loại. Muun thường đi theo bạn; muun loại thú cưỡi (mount) triệu hồi thú cưỡi có thể cưỡi được, bật/tắt bằng nút ở góc dưới bên trái màn hình hoặc bằng Ctrl + Z. Không thể cưỡi trong thị trấn, vùng an toàn, Chaos Castle hay Illusion Temple. Tiến hóa sẽ thay đổi ngoại hình của cả muun lẫn thú cưỡi.
Một ô phụ (sub slot) thứ hai được thêm vào túi muun (Y). Muun ở ô phụ vẫn phát huy chức năng nhưng không hiển thị trên màn hình, và cả hai ô đều có thể chứa muun loại thú cưỡi. Không thể trang bị hai con muun giống nhau. Bên cạnh loại chức năng chỉ số sẵn có, giờ còn có loại skill: muun tự tung skill theo tốc độ riêng, lên bậc skill khi tăng level, và mang một chỉ số thưởng cố định không tăng theo level.
Biến muun thừa thành đá tiến hóa
Mua một Muun Energy Converter từ NPC shop trong thị trấn (Silvia ở Elbeland, Fairy Lala ở Noria, Isabel ở Devias, Amy ở Lorencia, Leina ở Karutan), rồi kéo muun thừa hoặc đá tiến hóa thả vào nó. Item bị kéo vào sẽ mất. Khi đạt 120 năng lượng bộ chuyển đổi sẽ trở thành một Stone of Magic Power, và Exchange Agent Monica ở Elbeland (24, 229) sẽ đổi nó lấy đá tiến hóa của bất kỳ muun nào hiện có thể kiếm được. Bạn cần 1×1 ô trống trong túi muun và 4×4 ô trống trong túi đồ thường.
| Cấp muun | Lv1 | Lv2 | Lv3 | Lv4 | Lv5 | Đã tiến hóa |
|---|---|---|---|---|---|---|
| ★ | 3 | 6 | — | — | — | 8 |
| ★★ | 6 | 12 | 18 | — | — | 24 |
| ★★★ | 9 | 18 | 27 | 36 | — | 48 |
| ★★★★ | 12 | 24 | 36 | 48 | 60 | 80 |
| Stone of Evolution | 2 | 2 | 2 | 2 | 2 | 2 |
Gremory Case
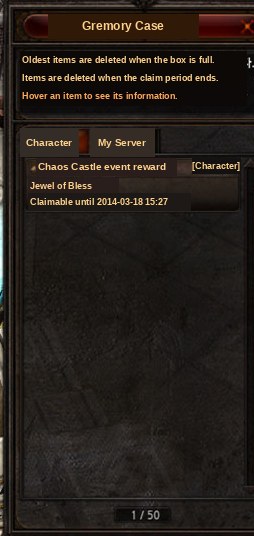
Phần thưởng bản đồ sự kiện và phần thưởng từ nhà vận hành không còn rơi thẳng vào túi đồ — chúng được chuyển vào Gremory Case, mở bằng phím K hoặc từ menu biểu tượng túi. Có hai tab: Nhân vật, chỉ nhân vật nhận được item mới thấy, và My Server, mọi nhân vật trên server đó đều thấy nhưng chỉ một nhân vật được nhận. Mỗi tab chứa được 50 item; vượt quá thì item cũ nhất bị xóa trước, và mỗi item có hạn nhận, quá hạn sẽ biến mất. Nếu túi đồ không còn chỗ trống, việc nhận sẽ bị hủy.
Phần thưởng từ Chaos Castle, Blood Castle, Illusion Temple, Doppelganger và mọi nội dung Battle Core đều được gửi theo cách này. Phần thưởng Battle Core được nhận trên server thường: mở cửa sổ Battle Core, chọn Reward collection, chọn sự kiện, và item sẽ được chuyển vào Gremory Case.
Hỗ trợ màn hình rộng
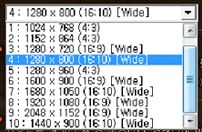
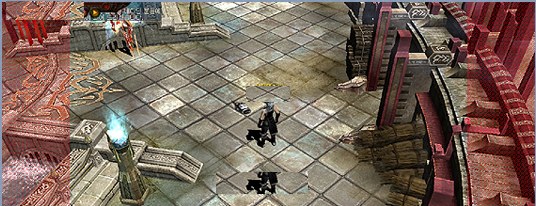
Nút Option settings của launcher cuối cùng cũng có độ phân giải màn hình rộng: 1024×768,, 1152×864 và 1280×960 ở tỷ lệ 4:3,, cùng 1280×720,, 1280×800,, 1440×900,, 1600×900,, 1680×1050,, 1920×1080 và 2048×1152 ở tỷ lệ 16:9 hoặc 16:10,, kèm tùy chọn chế độ cửa sổ. Các chế độ khả dụng phụ thuộc vào màn hình và card đồ họa của bạn.
Cải tiến giao diện và điều khiển
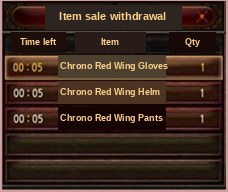
Cửa sổ shop có thêm nút item sale withdrawal (mua lại đồ đã bán) . Mọi item từng hiện hộp xác nhận đồ đắt tiền khi bán đều có thể mua lại trong vòng 24 giờ với phụ phí 10% giá bán. Danh sách lưu năm lần bán gần nhất; item giới hạn thời gian không bao giờ được liệt kê.
Phần còn lại của đợt chỉnh sửa: cửa sổ nhiệm vụ giờ mở bên trái nhân vật thay vì đè lên nhân vật, hiển thị toàn bộ lời thoại NPC trên một trang, cho phép chọn bằng phím số, và đổi nút cuối từ “Confirm” thành “Complete” khi nhiệm vụ sẵn sàng để trả. Mẹo game ở đầu màn hình giờ cuộn lên thay vì chạy ngang. Biểu tượng PC-bang trở thành biểu tượng buff bình thường, biểu tượng sự kiện và Battle Core được gộp thành một banner có thể mở rộng, và thanh HP của pet chuyển sang bên phải màn hình, có thể kéo thả tự do và thu gọn bằng dấu trừ — thanh HP party cũng vậy. Đếm ngược khi thoát game giờ có màu riêng và khóa nhân vật trong lúc client đóng, và cuối cùng item cũng có thể thả xuống vùng đất không đi được.
- Chiến trường liên server Battle Core
- Giải vô địch Plaza of Trials & Chaos Castle
- Uruk Mountain và Lord Silvester
- Seed sphere Tetra bậc 4
- Chuyên môn hóa chỉ số & Fist Master rank 6-9
- Gremory Case, muun thú cưỡi, hỗ trợ màn hình rộng